再也不用担心 OpenClaw 龙虾 tokens 不够用了,ollama 本地模型 + OpenClaw + WS 机器人 部署
安装环境
- ollama + qwen3.5:9b(机器1:3060 12gb N 卡),本地模型要选 ollama 带
tools标签的,不然 openclaw 无法使用 - OpenClaw(机器2: 因特尔 ultra5 125H, win10 22h2)
- 企业微信 ws 机器人(直接申请就完了,不用认证企业)
安装过程
企业微信 ws 机器人
- 下载企业微信电脑版
- 创建机器人(工作台 → 智能办公→智能机器人→创建机器人)

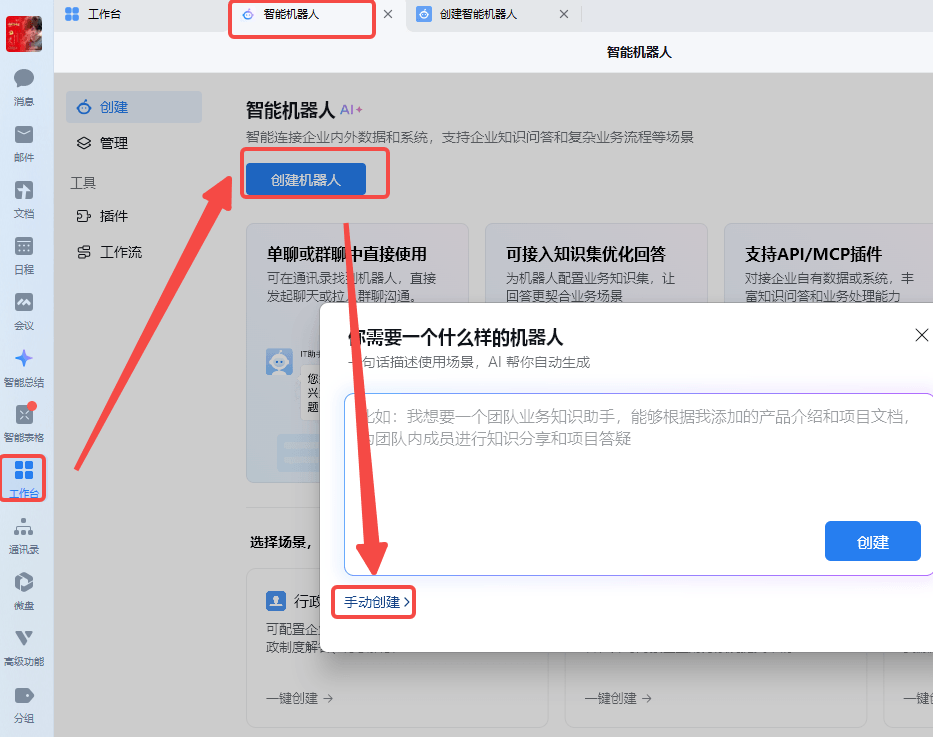
- 选 api 模式创建
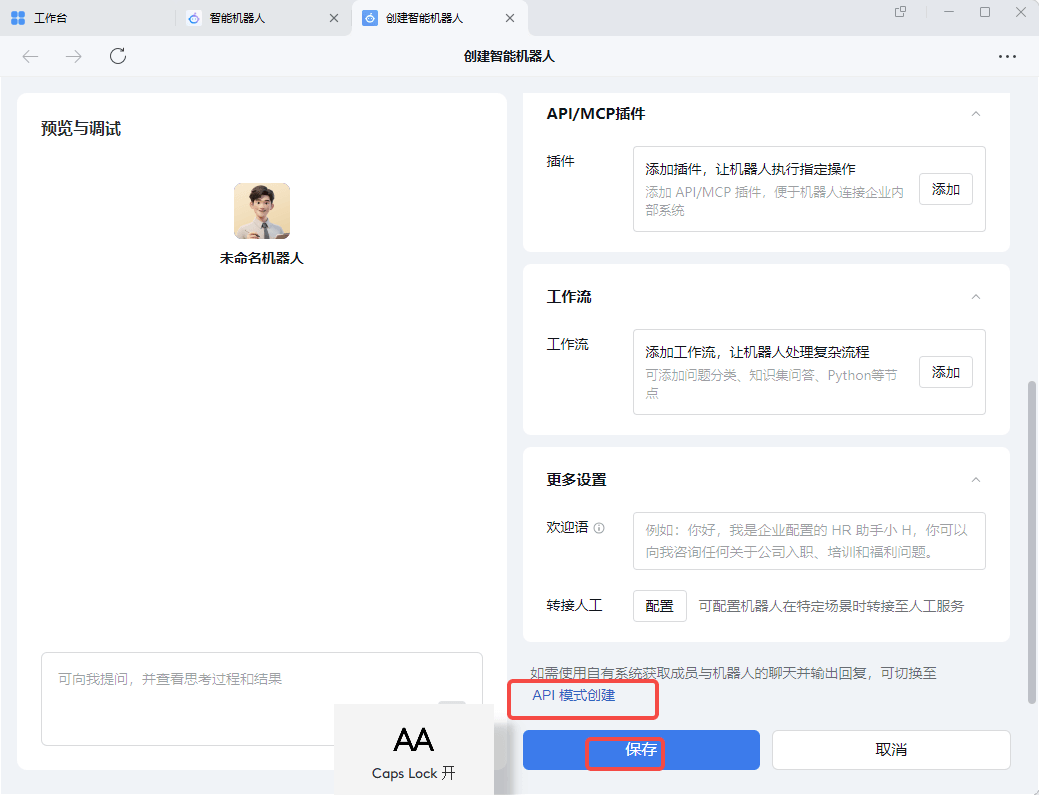
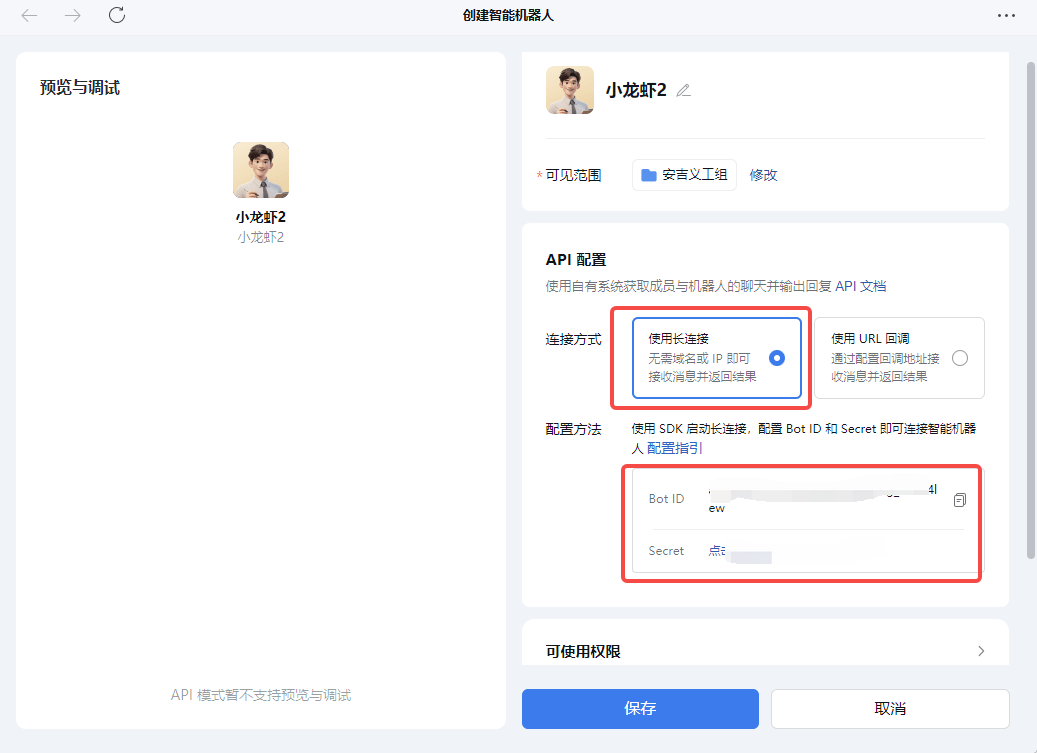
- 创建成功,连接方式选 长链接,然后记一下 bot id 和 secret,这两个要填到 openclaw 里的 channels 对应的字段里(具体看后面的配置文件)
飞书 ws 机器人
注意:飞书的长链接机器人提交需要管理员审核通过才能用哦
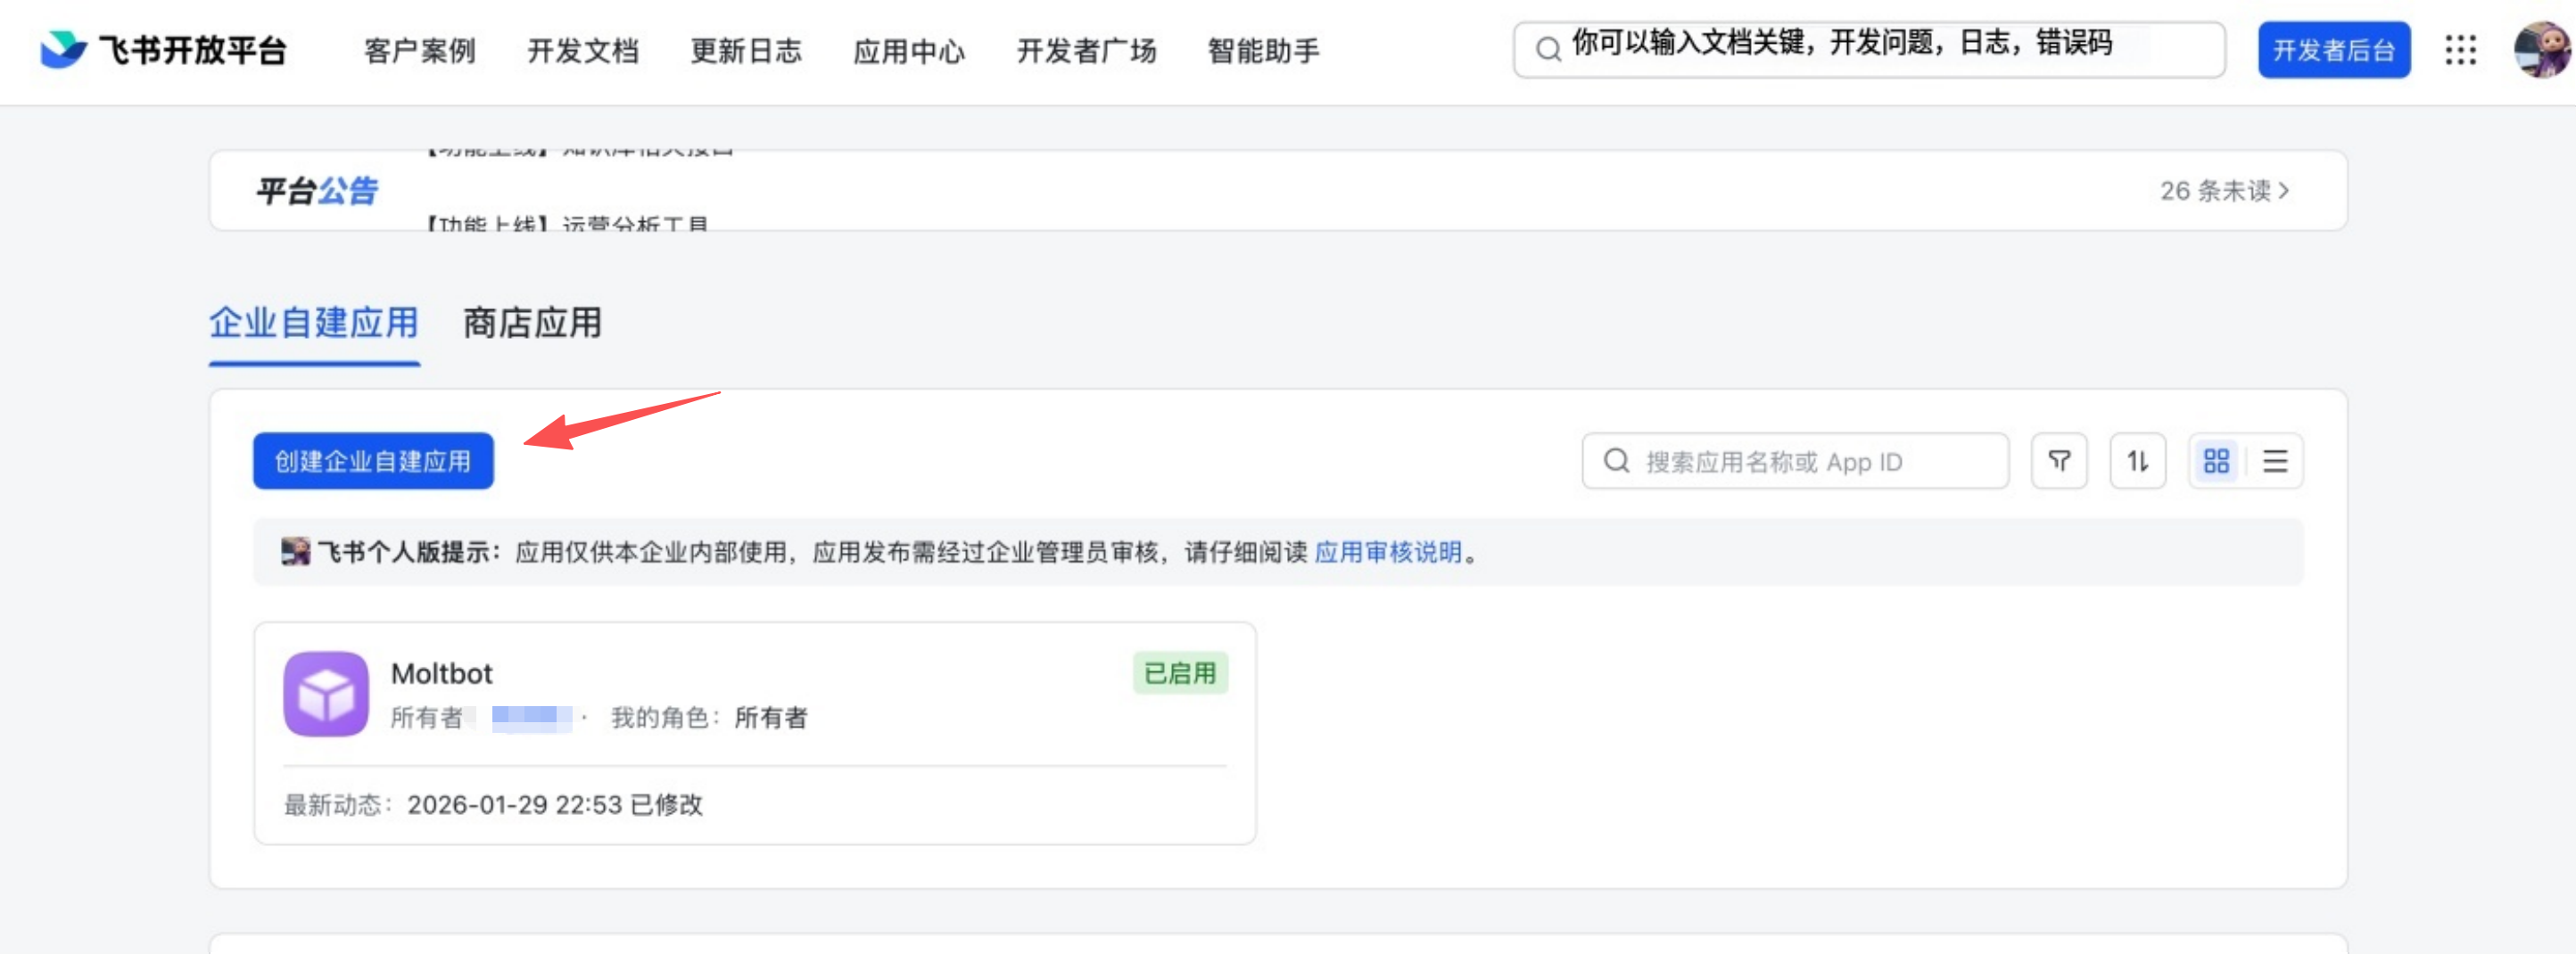
第一步:创建飞书应用
1. 打开飞书开放平台访问 飞书开放平台,使用飞书账号登录。Lark(国际版)请使用 https://open.larksuite.com/app,并在配置中设置 domain: "lark"。
2. 创建应用
- 点击 创建企业自建应用
- 填写应用名称和描述
- 选择应用图标
 3. 获取应用凭证在应用的 凭证与基础信息 页面,复制:
- App ID(格式如
cli_xxx) - App Secret
❗ 重要:请妥善保管 App Secret,不要分享给他人。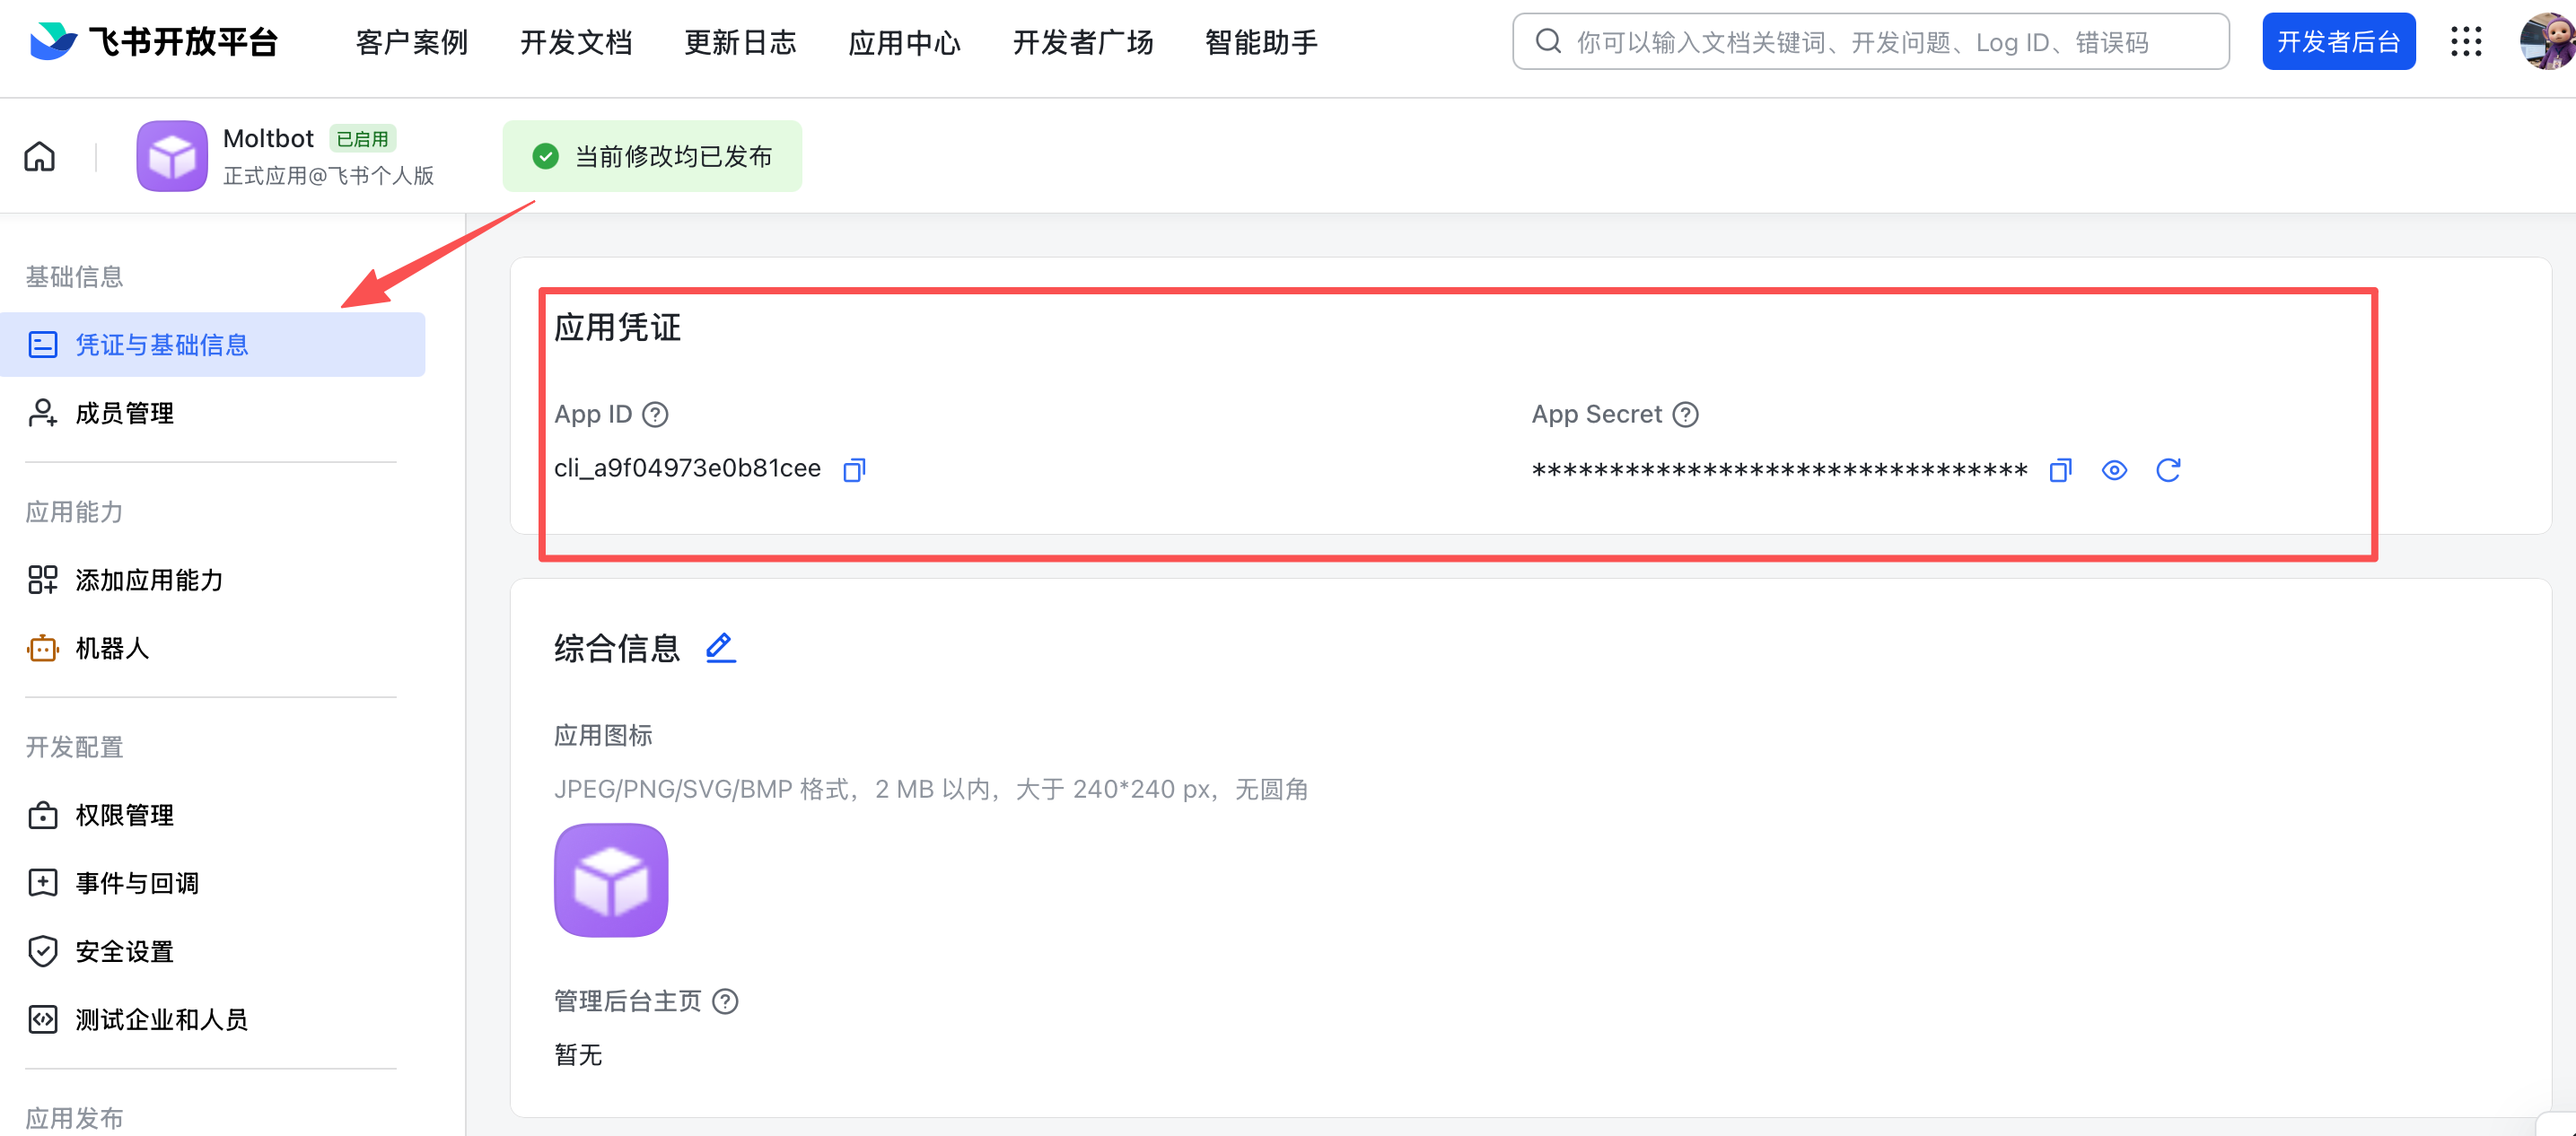
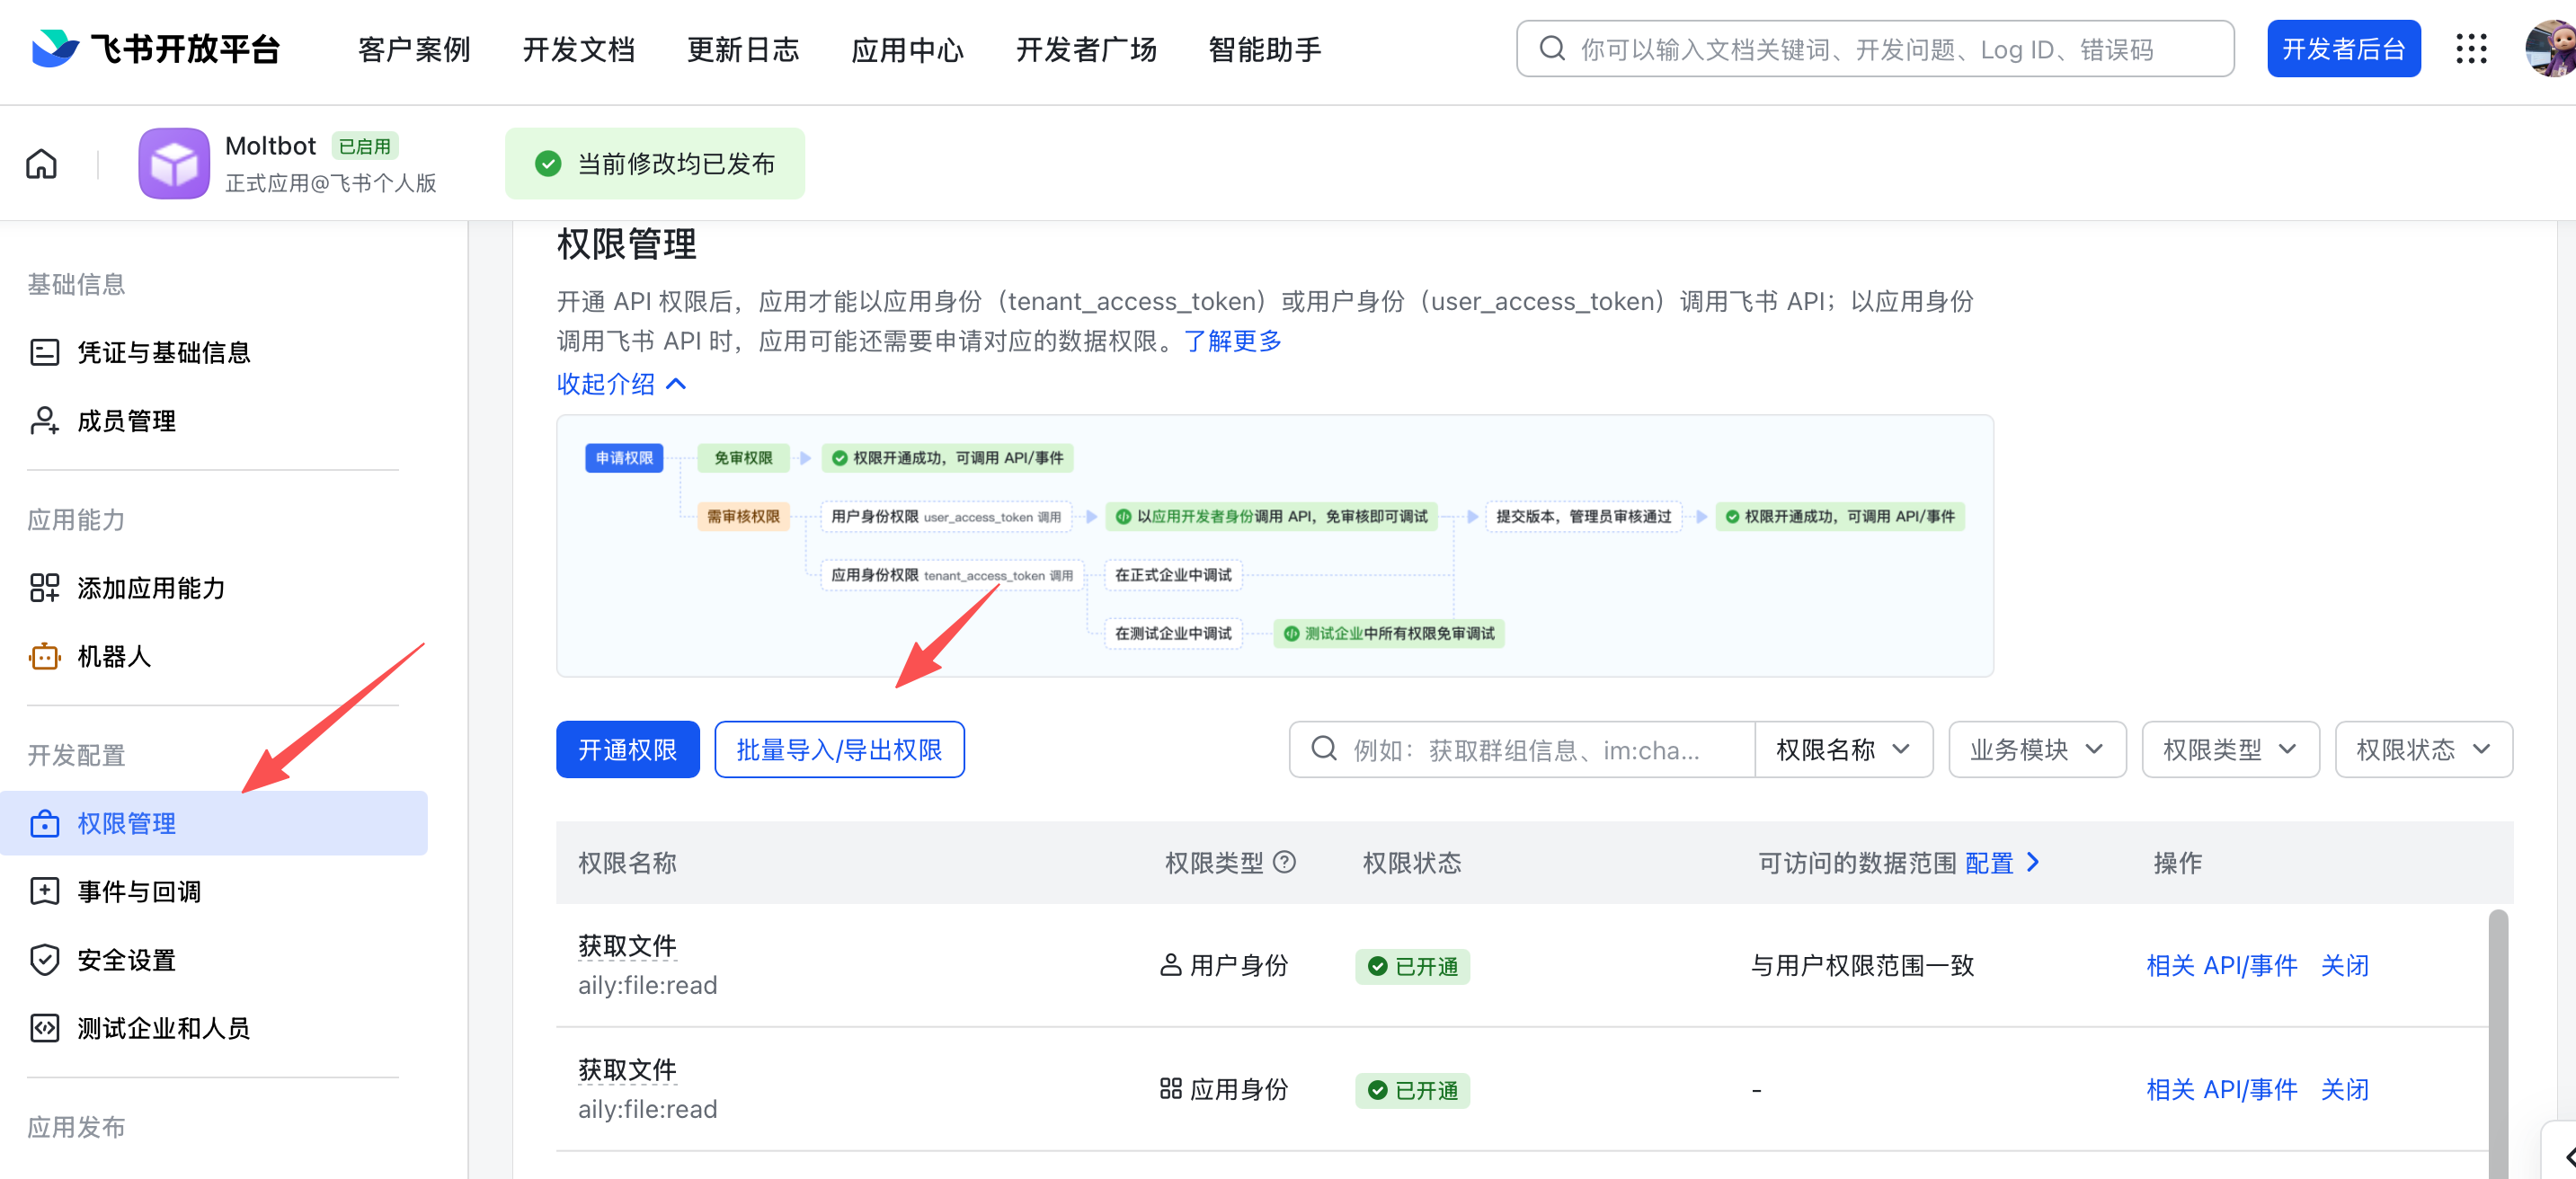
4. 配置应用权限在 权限管理 页面,点击 批量导入 按钮,粘贴以下 JSON 配置一键导入所需权限:
{
  "scopes": {
    "tenant": [
      "aily:file:read",
      "aily:file:write",
      "application:application.app_message_stats.overview:readonly",
      "application:application:self_manage",
      "application:bot.menu:write",
      "cardkit:card:write",
      "contact:user.employee_id:readonly",
      "corehr:file:download",
      "docs:document.content:read",
      "event:ip_list",
      "im:chat",
      "im:chat.access_event.bot_p2p_chat:read",
      "im:chat.members:bot_access",
      "im:message",
      "im:message.group_at_msg:readonly",
      "im:message.group_msg",
      "im:message.p2p_msg:readonly",
      "im:message:readonly",
      "im:message:send_as_bot",
      "im:resource",
      "sheets:spreadsheet",
      "wiki:wiki:readonly"
    ],
    "user": ["aily:file:read", "aily:file:write", "im:chat.access_event.bot_p2p_chat:read"]
  }
}
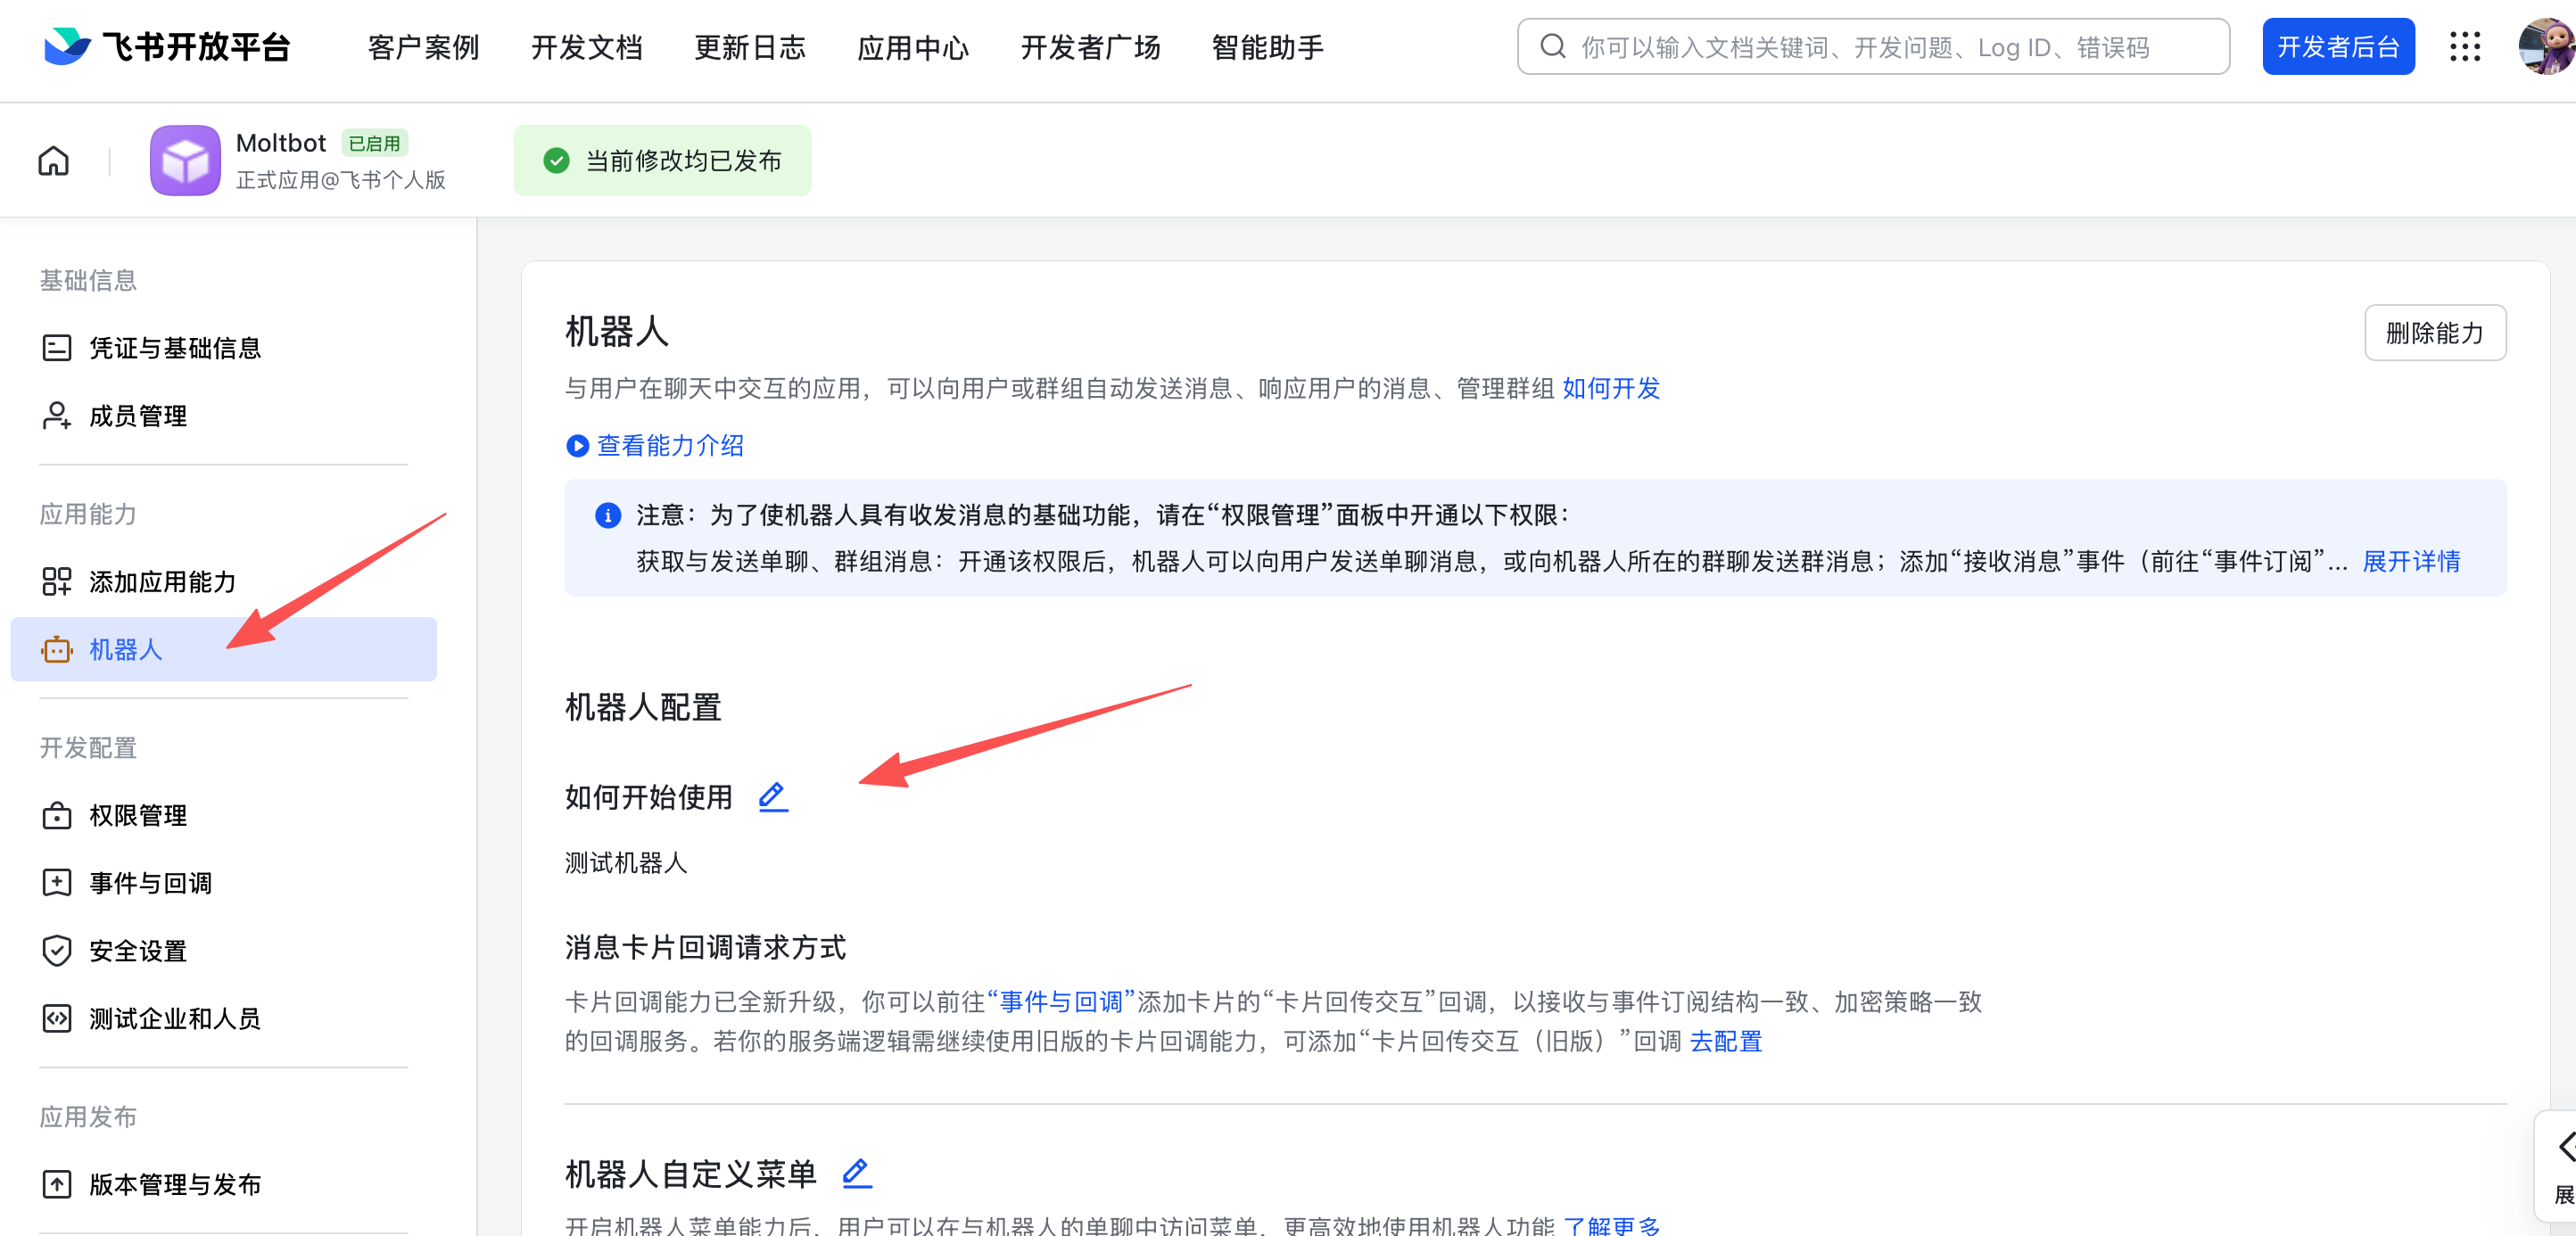
5. 启用机器人能力在 应用能力 > 机器人 页面:
- 开启机器人能力
- 配置机器人名称
6. 配置事件订阅⚠️ 重要提醒:在配置事件订阅前,请务必确保已完成以下步骤:
- 运行
openclaw channels add添加了 Feishu 渠道 - 网关处于启动状态(可通过
openclaw gateway status检查状态, 没启动的话用openclaw gateway启动就行了,不然飞书那边过不去)
在 事件订阅 页面:
- 选择 使用长连接接收事件(WebSocket 模式)
- 添加事件:
im.message.receive_v1(接收消息)
⚠️ 注意:如果网关未启动或渠道未添加,长连接设置将保存失败(用 openclaw gateway 启动就行了)。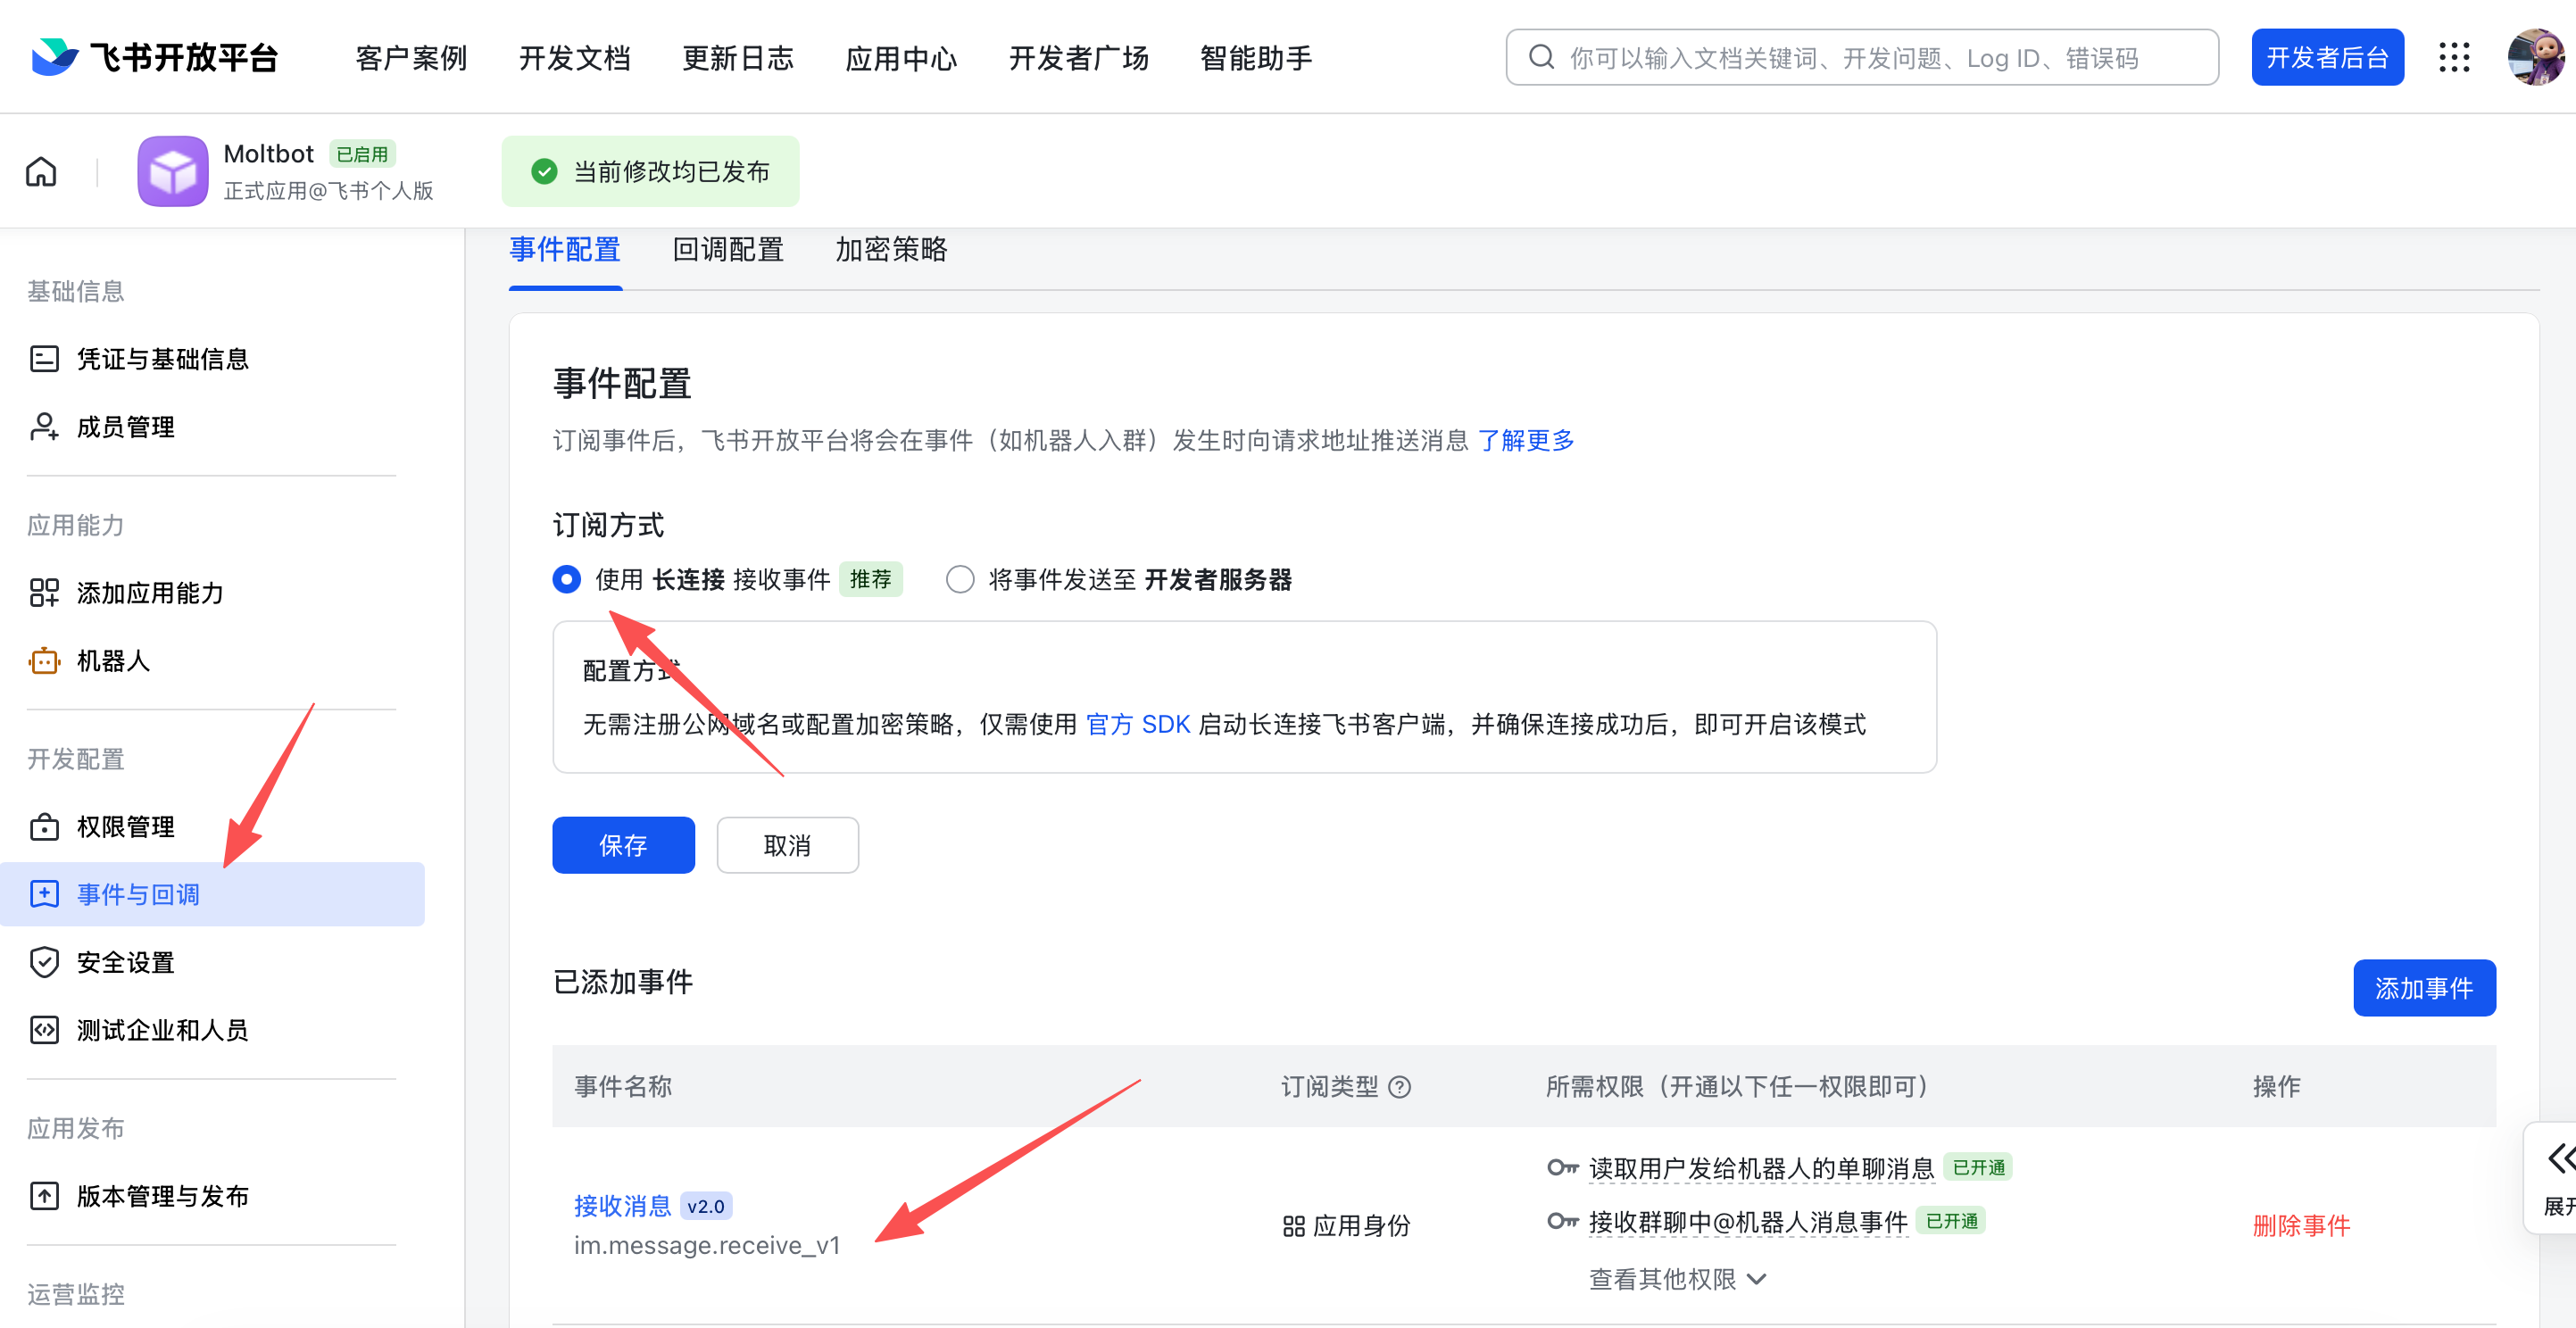
7. 发布应用
- 在 版本管理与发布 页面创建版本
- 提交审核并发布
- 等待管理员审批(企业自建应用通常自动通过)
安装 OpenClaw
- 先装 node, 官网下载包安装,版本要大于等于 22 版本,如果电脑的电脑模式选择不是高性能,要在 设置 → 屏幕 → 图形设置 → 浏览 → 找到 node.exe, 添加到高性能模式

- 更新集成显卡驱动(安装的时候提示报错)
- 管理员 powershell,更新安全策略(遇到错误丢百度、谷歌)
Set-ExecutionPolicy RemoteSigned -Scope CurrentUser -Force - 执行,一次不成功就多试几次,遇到错误就丢百度、谷歌
npm install -g openclaw@latest - 然后启动向导模式
openclaw onboard --install-daemon - 安装 微信 插件,多试几遍(这里最好把 微信机器人已经配置好)
openclaw plugins install @wecom/wecom-openclaw-plugin -
重启 OpenClaw
openclaw gateway restart -
添加企业微信渠道(以企业微信为例)
openclaw channels add - 在 select channel 步骤,选择 channel 为企业微信
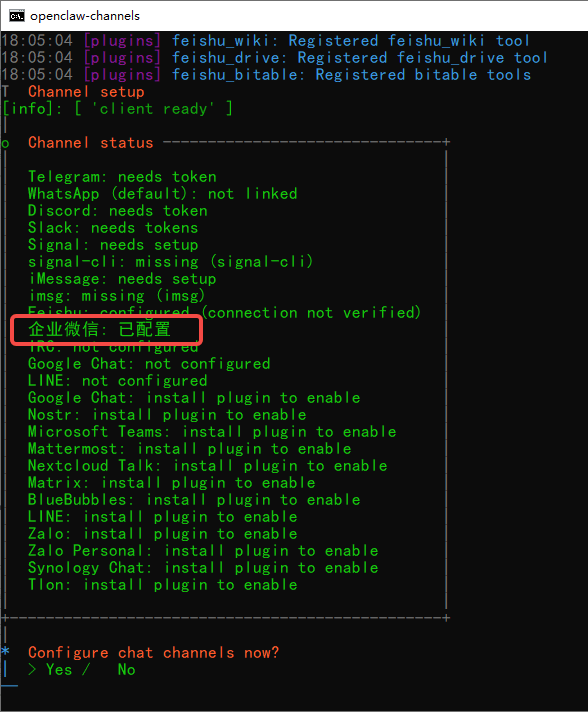
- 输入企业微信机器人Bot ID、Secret,可以复制后直接在 控制台右键就可以粘贴
- 选择 finish。
- 配对方式,选择 Pairing 配对模式
- 完成后续配置,并可看到配置渠道成功。
- 在企业微信中,保存机器人,并跟他发消息,会收到一个配置密钥的回复消息。(这个很关键哦)
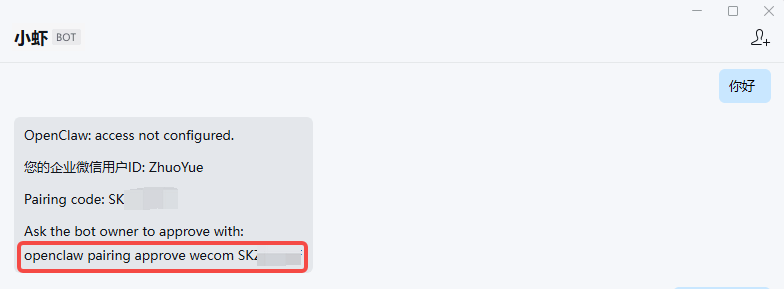
- 在 openclaw 的控制台输入她告诉你的命令配对
openclaw pairing approve wecom S*****F - 然后可以继续在 企业微信机器人的对话框继续聊天啦,加入群聊要 @它 才行哦
配置文件
附一份配置文件 openclaw.json
目录:C:\Users\Administrator\.openclaw (*** 是我替换我的隐私信息,这些大部分是你需要修改的地方)
{
  "meta": {
    "lastTouchedVersion": "2026.3.8",
    "lastTouchedAt": "2026-03-11T06:33:31.868Z"
  },
  "wizard": {
    "lastRunAt": "2026-03-10T08:19:44.100Z",
    "lastRunVersion": "2026.3.8",
    "lastRunCommand": "doctor",
    "lastRunMode": "local"
  },
  "models": {
    "mode": "merge",
    "providers": {
      "ark": {
        "baseUrl": "https://ark.cn-beijing.volces.com/api/v3",
        "apiKey": "***",
        "api": "openai-completions",
        "models": [
          {
            "id": "doubao-seed-1-8-251228",
            "name": "doubao-seed-1-8-251228",
            "reasoning": false,
            "input": [
              "text"
            ],
            "cost": {
              "input": 0,
              "output": 0,
              "cacheRead": 0,
              "cacheWrite": 0
            },
            "contextWindow": 200000,
            "maxTokens": 8192,
            "headers": {
              "X-Client-Request-Id": "ecs-openclaw/0202.1/i-yeexzr1gcgs6ipmj8lzw"
            },
            "compat": {
              "supportsDeveloperRole": false
            }
          }
        ]
      },
      "ollama": {
        "baseUrl": "http://127.0.0.1:11434/v1",
        "apiKey": "ollama-local",
        "api": "openai-completions",
        "models": [
          {
            "id": "qwen3.5:9b",
            "name": "qwen3-5 9b",
            "reasoning": false,
            "input": [
              "text"
            ],
            "cost": {
              "input": 0,
              "output": 0,
              "cacheRead": 0,
              "cacheWrite": 0
            },
            "contextWindow": 200000,
            "maxTokens": 2000000
          }
        ]
      }
    }
  },
  "agents": {
    "defaults": {
      "model": {
        "primary": "ollama/qwen3.5:9b",
		fallbacks: ["ollama/qwen3.5:9b"],
      },
      "models": {
        "ollama/qwen3.5:9b": {}
      },
      "compaction": {
        "mode": "safeguard"
      },
      "maxConcurrent": 4,
      "subagents": {
        "maxConcurrent": 8
      }
    }
  },
  "messages": {
    "ackReactionScope": "group-mentions"
  },
  "commands": {
    "native": "auto",
    "nativeSkills": "auto",
    "restart": true,
    "ownerDisplay": "raw"
  },
  "channels": {
    "feishu": {
      "appId": "***",
      "appSecret": "***"
    },
    "wecom": {
      "enabled": true,
      "botId": "***",
      "secret": "***",
      "allowFrom": [],
      "dmPolicy": "pairing"
    }
  },
  "gateway": {
    "port": 18789,
    "mode": "local",
    "bind": "loopback",
    "auth": {
      "mode": "token",
      "token": "***"
    }
  },
  "plugins": {
    "entries": {
      "feishu": {
        "enabled": true
      },
      "wecom-openclaw-plugin": {
        "enabled": true
      }
    },
    "installs": {
      "feishu": {
        "source": "npm",
        "spec": "@openclaw/feishu",
        "installPath": "C:\\Users\\Administrator\\.openclaw\\extensions\\feishu",
        "version": "2026.3.7",
        "resolvedName": "@openclaw/feishu",
        "resolvedVersion": "2026.3.7",
        "resolvedSpec": "@openclaw/feishu@2026.3.7",
        "integrity": "***",
        "shasum": "***",
        "resolvedAt": "2026-03-10T08:42:33.043Z",
        "installedAt": "2026-03-10T08:42:43.149Z"
      },
      "wecom-openclaw-plugin": {
        "source": "npm",
        "spec": "@wecom/wecom-openclaw-plugin",
        "installPath": "C:\\Users\\Administrator\\.openclaw\\extensions\\wecom-openclaw-plugin",
        "version": "1.0.6",
        "resolvedName": "@wecom/wecom-openclaw-plugin",
        "resolvedVersion": "1.0.6",
        "resolvedSpec": "@wecom/wecom-openclaw-plugin@1.0.6",
        "integrity": "***",
        "shasum": "***",
        "resolvedAt": "2026-03-11T03:51:30.061Z",
        "installedAt": "2026-03-11T03:52:06.691Z"
      }
    }
  }
}
常用命令
其他常用命令
# 设置当前使用的模型
openclaw models set ark/doubao-seed-2-0-lite-260215

# 设置当前使用的模型
openclaw models set ollama/qwen3.5:9b

# 重启网关,改动配置文件或者安装插件后重启以下
openclaw gateway restart

# 停止网关,关闭服务
openclaw gateway stop

# 下次运行时需要再次启动
openclaw gateway start

# 查看实时日志
openclaw logs --follow

# 只看最后 N 行日志,比如 50 行
openclaw logs --lines 50

# 清理旧日志
openclaw logs --clean

# 查看全面的系统状态信息
openclaw status --all

# 检查并更新 OpenClaw 到最新版本
openclaw update

# 列出所有会话
openclaw sessions list

# 清理不活跃的旧会话,释放 token
openclaw sessions cleanup

# 安装新技能/扩展
openclaw extension install <github-url>

# 列出已安装扩展
openclaw extension list

# 更新已安装扩展
openclaw extension update

# 卸载扩展
openclaw extension remove <extension-name>

# 打开交互式配置向导

openclaw config

# 查看当前配置
openclaw config show

# 深度检测各个通道连接状态
openclaw status --deep

# 查看系统信息和依赖
openclaw doctor

# 列出所有定时 cron 任务
openclaw cron list
技能网站
- https://skillhub.tencent.com/#categories
- https://clawhub.ai/skills?sort=downloads
- https://skillsmp.com/zh
官方网站
^_^

文章部分资料可能来源于网络,如有侵权请告知删除。谢谢!
前一篇: 如何判断测试各岗位人员的主动性
关于作者
Zhuoyuebiji ( 广东·深圳 )
🚩成长的时候,能帮有需要的你
我是 卓越笔记,软件测试工作者,热爱互联网,喜欢琢磨,遇到问题就一定要找到答案。我的博客主要记录学习中遇到的知识点和遇到的问题及问题的解决方法。欢迎同样热爱互联网的小伙伴们交换友链,一起探索互联网的世界 😊